ShopDreamUp AI ArtDreamUp
Deviation Actions


Suggested Deviants


Suggested Collections


You Might Like…


Description
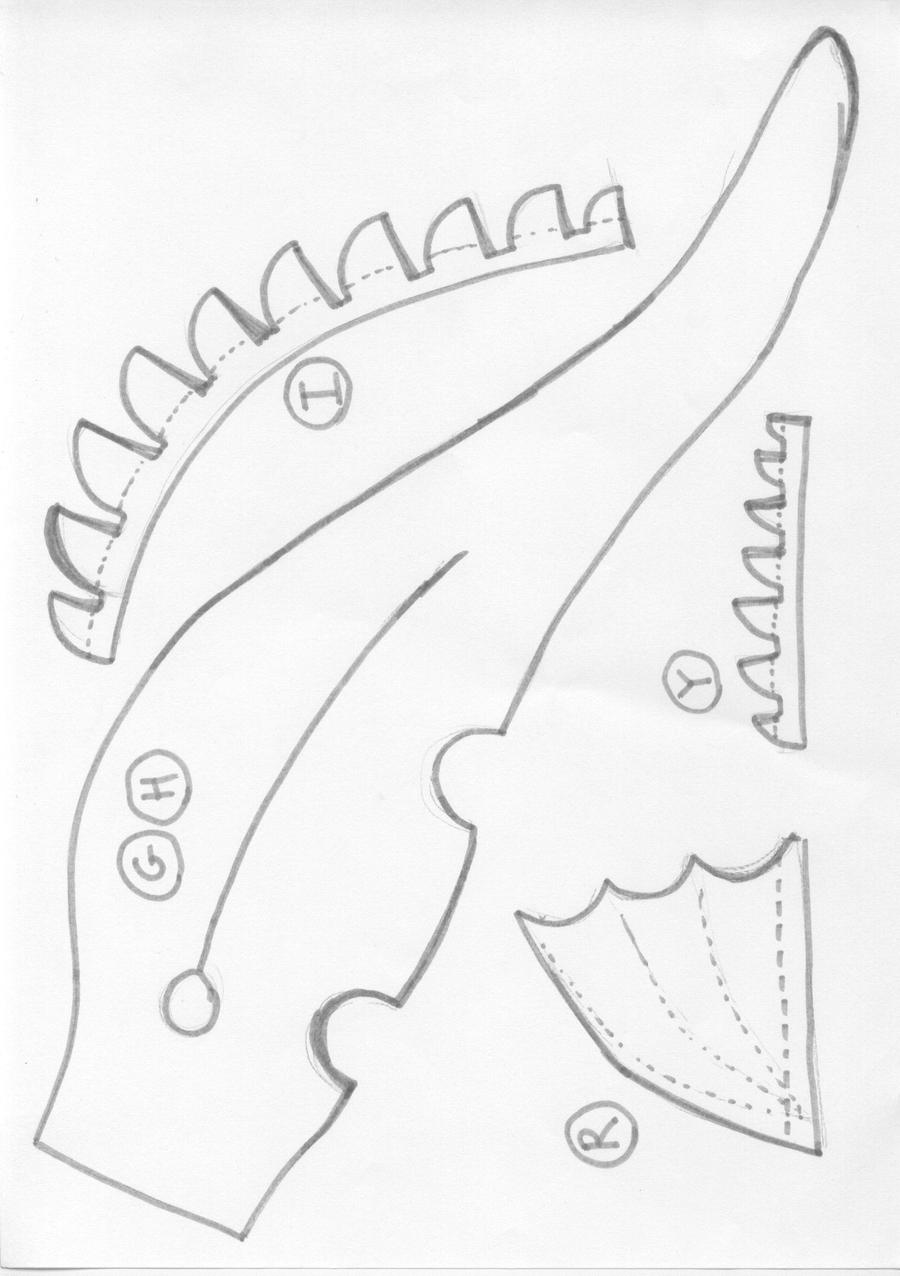
This is the first part (of 4) of the finished pattern, I am releasing.
The pattern is for a highly detailed Toothless-inspired plush dragon.
NOTICE: There will be an upload with an alternate tail-fin for those who want it to be completely true to the movie.
THIS image is of exactly A4 size and made for printing:
Do not let your printer resize the image - instead, have it crop the edges, that fall outside of the printable area.
Remember that all pieces that are not spikes or claws will NEED a ½cm seam margin. Don't forget to add this.
For a reference on the pieces, please see the Piece Overview here:
[link]
Also... I better get to making a sewing tutorial.
In the mean time, Spirit-of-america has a tutorial, that can be used... most of the way:
[link]
Tutorial down there vvv
More info will probably be found here in the near future.
_____
Previous:
Next: [link]
_____
- Projecttoothless
Tutorial Here:
What to do first:
Cut out the following pieces:
1xG
1xH
4xR
1or2x I
2x Y
The main recommended fabric is Fleece, but if you know of a better alternative, go ahead and take that instead.
Now what?
First thing first:
The body actually isn't the first thing, you'd make, but preparing for later never hurts, and there's something, you CAN do right away:
You can sew the two back-pieces together:
a) If you're using two I pieces (to get a thick row of back-frills), the first step is to pin those together. They're so small, that they can't be turned inside out after sewing (unless you upscale the pattern), so we'll sew them on the outside. Align the spikes of the two pieces and pin them together.
Tip:
Since, they're not going to be turned inside-out, you can also use a patch of scotch tape (Fold it twice, so it adheres to itself) to hold the two pieces together. Nevermind if the piece of tap ends up inside the frills.
b) (OPTIONAL): You can now make a straight seam close to the spiky edge of the pieces, if you like the effect of that.
c) Now, zig-zag along the spiky edge of the pieces, preferably with a narrow zig-zag.
d) Align the back-pieces with your back-frills inside them and pin them together as shown in the drawing (Coming soon). The back frills should be placed, so they have about 3cm/ 1 inch of distance to where the head is supposed to go.
e) Now, sew all the way along the back, (The LEFT side of the G piece in the picture) locking the frills inside - if done correctly, your seam should be right along the dotted line of the I-piece(s).
Preparing the hind fins:
Now, that's piece R. We have 4 of those, and the method is very much like in the wings (see part 4)
a) Align two of the pieces on top of each other and pin them together.
b) Have a look at the two methods for the wings - you'll be choosing between two similar methods here:
b2) (OPTIONAL) Just like with the wings, you can use a small strip of scrap fabric to make the fins slightly thicker in one side.
c) Either sew all along the outside of the hind-fins and turn them inside out before adding the straight seams along the lines in the middle -
OR -
Sew just along the one side (Bottom left in the picture), turn it inside out, align the "fin-tips". Then (Optional: Make a seam along the very edge of the fin-tips) - zig-zag the the fin-tips together (Upper side of the pirce in the picture). Lastly make straight seams along the lines in the middle.
Done.
Image size
1650x2338px 721.66 KB
Comments24
Join the community to add your comment. Already a deviant? Log In
what material was used to create the one you used. it looks like felt.